easy DIY Mini Router Table for trim routers
This versatile mini router table will work with any small trim router. It can be fastened to any MFT style work top with 20mm dog holes either on top or hanging off the side. It has a built in tool tray and can be easily disassembled for storage when not in use and can be made with a little more than 1/4 sheet of plywood.
Tools & Supplies
*I use affiliate links, please see details on my disclaimer.
Countersink Drill Bit - https://amzn.to/3I2BxWk
5 Minute Epoxy - https://amzn.to/48jFbpe
¼” Acrylic Sheet 12”x12” (comes in clear or black) - https://amzn.to/47p0TYM
T-Track (x3) - https://amzn.to/3vp7ghf
Threaded Knobs (female)– https://amzn.to/41QOZWb
T-Bolts - https://amzn.to/3S9U9JV
Threaded Inserts - https://amzn.to/48KQ6ZI
Thumb Screws - https://amzn.to/3TOp4ws
20mm Forstner Bit – https://amzn.to/48iZseD
Power-Loc bench dogs (x2) - https://tsoproducts.com/bench-dogs/tso-dogs/power-loc-bench-connector-dogs/?ref=MWAWW
UJK Chamfer/Reamer Tool - https://tsoproducts.com/bench-dogs/accessories/ujk-combined-chamfer-reamer-tool/?ref=MWAWW
Spiral Flush Trim Bit - https://bitsbits.com/product/cm250ft-flush-trim/ref/6244/ 10% OFF using code MWA10
Bowl & Tray Router Bit - https://bitsbits.com/product/1372b/ref/6244/ 10% OFF using code MWA10
Router Bit Storage Inserts - https://amzn.to/3TRjSb3
Shop Vac Dust Port - https://amzn.to/3P8xSKH
Phenolic Plywood (optional for Top) - https://amzn.to/3NVIWdf
Router Table Leveling Inserts (optional) - https://amzn.to/3H7Hr8f
UJK Parf Guide – https://tsoproducts.com/tools-equipment/ujk-parf-guide-system-mark-ii/?ref=MWAWW
DeWalt Cordless Router – https://amzn.to/3OHDtHq
Making a Mini Router Table
This palm router is one of my FAVORITE tools.I grab this little router more often than any other.But using it as a handheld router isn’t unlocking all of it’s capabilities.To solve for that I built a mini router table.
A fully functional benchtop router table with adjustable fence, dust collection, accessory track and tool storage. It can be disassembled without tools and can be used off the side of an MFT or attached to a base.
This whole project can be done with just about a ¼ sheet of plywood although I made a couple exceptions on mine.

Mini Router Table Top
I went with black phenolic Baltic birch for the top.
This phenolic coating is very durable and I think the black just gives it an awesome look.

This stuff isn’t cheap, a 2ft x 2ft piece is $40 bucks but I’ve always wanted to try this stuff so I pulled the trigger.
Black Formica is another option if you already have it on hand.
I’ve got that on a few jigs here in the shop or just go with bare plywood and give it a poly finish for some durability.

This 2ft piece gives me enough material to make the top and the main body of the fence which I’ll build later.
This top needs some grooves cut in it so I can slide some t-track in there which will make the fence adjustable and give me some work holding options as well.

I like to make these grooves by setting the fence and making a cut on both sides, then tapping the fence away from the blade and repeating that.
Using this method guarantees the tracks are the same distance from each edge.
You can do this faster with a dado stack but I find just using a ripping blade with a flat grind tooth works as well for small dados.
AND, it means I can sneak up on that sweet, sweet perfect fit. Ahhh so satisfying.

This build will need 3 pieces of 24” t-track which can be cut down to final size of 18” using the miter saw.
Fun fact of the build, aluminum can be cut with regular woodworking blades, and now you know!

To attach these tracks I’m going to mix up some 5 minute epoxy.

Mini Router Table Fence
While I wait for that epoxy to fully cure I’l get to work on the fence for this bad boy.
I grab those pieces phenolic ply I cut earlier and on the face of the fence I’m going to add another groove for some more t-track.
And on the piece that makes the base I added some pocket holes on the underside.

That will let me join the fence parts together without having screw holes on the face of the fence.
And those pocket holes will never be seen on the bottom of the fence.
Then I can add these little supports that I dog-eared.

Two sided tape will hold them in place while I drill a pilot hole and sink a screw INSIDE the dado where the t-track will eventually cover it up.

I added a second screw to the underside of the fence and that will do the job nicely.

BUT just as I finished that I realized I skipped a step in the process!
I didn’t add my opening on the fence for the bit to go.
Eh, that’s not too bad, I just unscrew everything like a big fat undo button and keep on trucking.

I used a Forstner bit to bore the holes in both pieces and then over to the band saw to cut the remaining waste and make a little archway.

A jigsaw will work too or even a small flush trim saw, I’m not removing that much material here.

THEN everything gets screwed together and we can move on.
Oh, and the t-track gets epoxied in just like before.


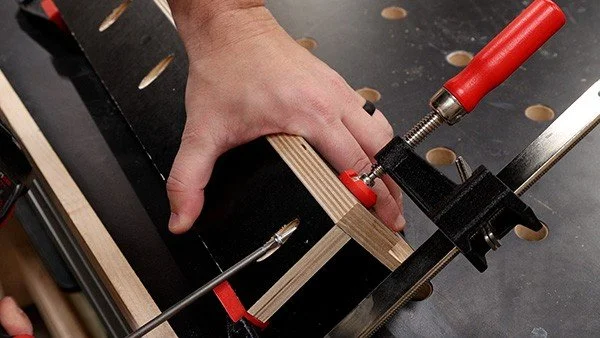
To attach the fence I line it up with the t track and mark the spot.

I can transfer my lines up and mark the hole locations with a center punch and drill those out.

I’m using T-bolts here and those slide into the track.

Then the fence drops on.

The star knobs lock everything down and Bob’s your uncle.

Mini Router Table Plate
Shifting gears for a minute I need to make the plate that will attach to the router and allow it to drop into the table.
I’m making it out of a sheet of ¼” acrylic. I went with black because it will be awesome with the phenolic ply but you can get it in clear as well.

Just like the aluminum t tracks, it can be cut with your regular woodworking tools. But beware this stuff can be “chippy” even with a sharp blade. So, I backed up my cuts with my crosscut sled and a piece of scrap ply on top. This sandwiches the acrylic on all sides effectively making a zero-clearance cut all the way around.

I love making router plates because they seem like they’d be difficult but are actually really simple to do.
First, I found the center of the blank by marking from corner to corner.

Then I set my router’s stock base plate over the top, squared it up and marked out the screw hole locations. Every router’s hole pattern is different but this process works no matter what.
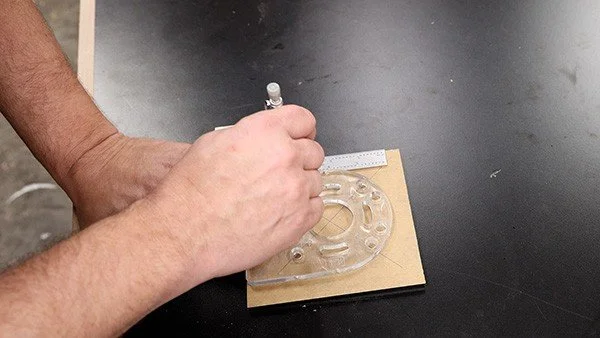
The center hole gets bored out with a Forstner bit and creates a crazy mess of wild looking shavings.

The mounting holes are a two step process.
Because the heads of the screws need to sit below the surface I need to countersink these about halfway through with a wider drill bit.

Then I can go back with a smaller bit and finish the through holes.

Just like that we’re done. Well almost. I need test the fit of the plate on my router and it fits perfect!

Mini Router Table Opening
Now that I have the router place I can make the hole in the table to fit it.
I carefully mark out where I want the opening to be and mine will be set a little bit forward of the center of the table.

Then I can drill out all four corners with a large drill bit.

I can drop my jigsaw in there and cut a rough opening staying as close to my lines as possible without causing chip out on the surface.

To finish the job, I created a template out of scraps of ply just glued together and used the router plate blank as my guide.
Two-sided tape will do a good job holing the template in place around the reference lines.

I’m using a ¼” spiral flush trim bit from Bits and Bits which will do this job perfectly but because the bearing is on top I need to flip my table over and rout from the underside.

I’ll leave a link to the bit above if you want to check it out because it did an amazing job on this plywood.

Nice and flush and clean!

OK now I just need to round off the corners of this plate so it fits perfectly.

To support the router plate I bought these router plate levellers.

They screw into the top at all four corners of the router opening.

They have adjustable tum screws to make sure the router plate is perfectly flush with the table.

Mini Router Table MFT Attachment
And the last thing I’m going to add to this top is a pair of very precisely placed 20mm holes.
I want to be able to attach this to my MFT workstation using amazing Power Loc dogs.

If you don’t know about these go back and watch my video 9 Tools I Regret Not Buying Sooner because I go into a bit more detail there. Anyway, I need to locate these holes exactly over two of these dog holes and there’s at least two ways to do that.

A couple videos ago I made a portable workbench and put this grid of holes on the top using the UJK Parf Guide system which helps you create an extremely precise grid of holes just like a Festool MFT.
I also thought ahead and used the Parf Guide to make this small template that I can use to drill these precise holes without needing to set up that jig.

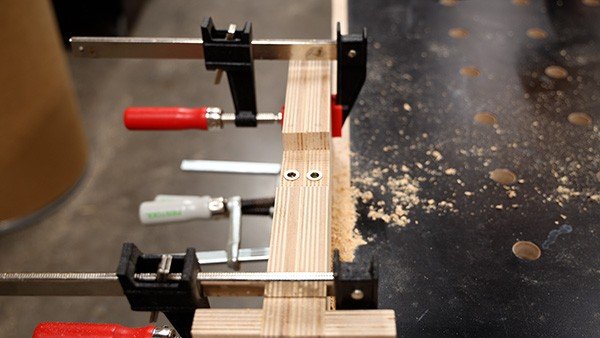
So, I can just line up this template where I want my holes to be placed, fasten it to my work piece and drill out these holes using a 20mm drill bit.

The key here is to drill these holes as straight as possible which is why I’m using the little guide from the Parf system. You can also use a portable drill guide or just do it by hand and let the template guide the bit straight.

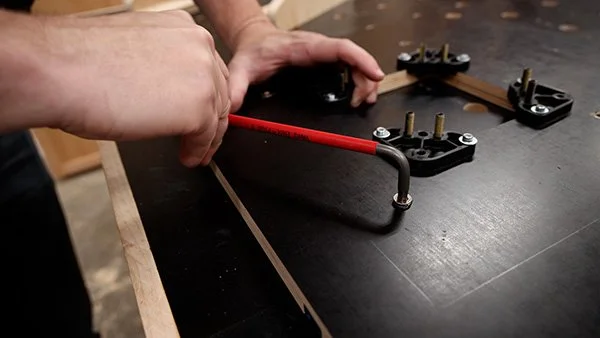
The last thing I need to do is put a tiny chamfer on these holes to accept the Powe Loc dogs.

UJK makes this little chamfer reamer tool that cleans out your dog holes and cuts this chamfer, of you can just use a router with a chamfer bit, works just as well.

Now I can slide these Power Loc dogs into those holes and through the MFT.
And when I turn this bolt on top it clamps the Power Log dogs into place and I have a perfectly secure connection and its completely flush so my router fence can slide right over it, no need for clamps!

These Power Loc dogs are so clutch and after drop in the router and set the fence in place I love this thing even more that I imagined when I designed it.

It’s the perfect working height for me as a natural extension of the work table and I have easy access to the router switch too.

And the dust collection through that little port is great, there’s nary a sign of debris below the router.

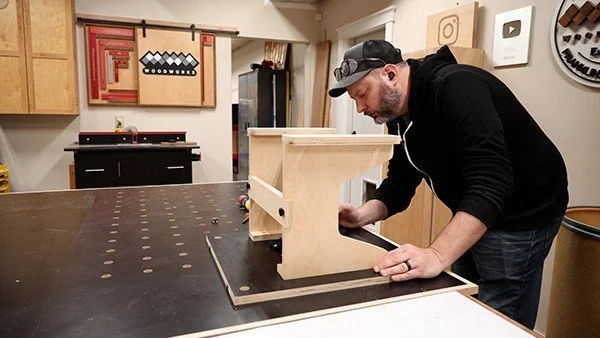
Mini Router Table Base
While it’s nice to hang the router table off my MFT, I realize some people might not have that option and sometimes I may want to use this thing in different locations so I want to make a base.
As I was designing it I had three requirements.
It needs to be as lightweight as possible, it needs to disassemble easily that way when I’m not using it I can store it away easier or travel with it and it needs a tool caddy so I can keep some bits and my collet wrench close at hand.

Once I get the sides cut to final dimension I’m going to cut out a large chunk to kind of give it a cantilever look.
And to make this whole process easier I ganged both side pieces together so whatever I cut out is done to both sides at the same time making sure they exactly match.

I marked out some layout lines where I thought the cutout needed to go, these are just rough guides with no curves.
I made the basic straight cuts at my bandsaw, you can use a jigsaw too but I find a bandsaw to be much more enjoyable for these cuts.

I remove most of the waste and stay just off my lines then I can go over to the belt sander and sand back to the lines I drew.

Then I can round over the outside corners but the inside corners are a different deal I cant reach in there with this sander so I swapped over to my spindle sander to really get in those inside corners and then I finished finessing the entire profile until I arrived at this.

To be able to attach this base to the top I’m going to add some strips to the top edge of the sides.

To connect these I’m using dowels. I could definitely use my domino here but hey I never use my dowelling jig anymore so I thought maybe I should give it a little love.

And with a little glue and clamps and we wait.

Oh, one thing I totally should have done while my sides were still ganged together is add the notch on the back side which is where the back stretcher will be housed.
That will save some time and you won’t have to contend with those cleats. But my pain is your gain, I guess.
I just sneak up on the right fit and then I want to add some threaded inserts. Remember I said I wanted this to disassemble easily and I decided to make it so it could be taken apart without the need for tools.
Locating these is fairly easy with a pilot hole going through the back stretcher and into the side. This will make sure the parts mate up perfectly.
Then I can go back and enlarge those pilot holes to fit the inserts.
I added these without epoxy but you can certainly add a dab to the threads if you want.

Quick side note, I went back and made the back stretcher longer so it sits proud on each side by a ¼”. I was afraid there wasn’t enough material between the bolt hole and the edge of the stretcher and didn’t want to risk breaking it.

For the feet I cut out two strips and added a couple dowels to each.
Those correspond to holes I drilled on the bottom of this blank which will eventually be the tool caddy and they just slip together like this, no glue just friction.

I’m adding the blank now as a spacer to align where the feet should screw into the base.
I’m using a clamp just to bring the sides in contact with the blank, not too tight because I want to be able to pop the tool caddy off in the future.

Now I can draw some reference lines and countersink some pilot holes using my favorite bit from Amana tools.
It drills the pilot hole and countersinks it all in one shot. Sweet mamacita!
OK, you could stop right there with the feet but I wanted to take it one step further cause that’s what I do.

I wanted to add more of those dog holes so I could use my Power Loc dogs on the base as well.
I used the same template as before and added a pair of holes to to each foot on the OUTSIDE, not on the inside.
I made the foot so it sticks out wide of the sides, that way if you want to add these holes you can, or if you want to just use clamps you can do that too. See, options are the best.

Attach The Base to The Top
Now I need to fasten the base to the top and I’m using threded inserts for that as well.
I added some holes to the cleats and used the point of the drill bit to locate the position of the inserts on the bottom of the table.
I added my inserts. Again, I used no epoxy, again, do what you please.
I did find these smaller thumb screws on line and I like them better for this because they are really low profile and wont get in the way. And they are cheaper.

And the Power Loc dogs work great on the base too! This thing wont move at all while use it!

And you can see here how the added height of the base makes it better to use on my outfeed table because it’s much lower than my MFT workstation.
The Power Locs dogs still work beautifully and my router table wont move around on my when I’m cutting.
So with everything reinstalled there’s just one more detail to add and that’s a proper tool caddy.

Mini Router Table Tool Tray
To create the tray area I just made another template like I did for the top and routed out the pocket using a bowl bit with a bearing, also from Bits & Bits.
I’m cutting ¼” into the wood so I took two passes to safely cut this out by hand.


And a Forstner bit made quick work of some holes along the front edge for the router bit storage and I made these holes large enough so I could use these Rockler router bit storage inserts.

They just pop in like that nice and tidy.

Now to take everything apart and soften all those sharp edges!

After that I put it all back together QUICKLY and I absolutely love how this turned out! Beautiful and functional.

So there you go, a benchtop router table for any trim router, with an adjustable fence, dust collection, t-track and the whole thing can be disassembled by hand.