
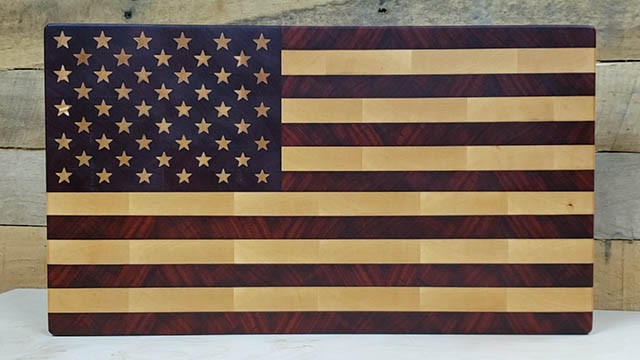
Amp up your summer gatherings with some patriotic flair! This American flag cutting board is as functional as it is beautiful. I’ll show you the steps I used to carefully craft one of these beauties. This would make a great summer seasonal gift or a thoughtful handmade gift for military/veteran loves ones!

DID YOU KNOW: You can follow me on these social media platforms!
Instagram · YouTube · Facebook · Pinterest
| Materials & Supplies* | Tools* |
| (1) 4/4 Purpleheart | Table saw |
| (1) 4/4 Paduak (or bloodwood) | Drum Sander |
| (1) 4/4 Hard Maple | Parallel Clamps |
| Water Resistant Wood Glue | Random Orbit Sander |
| Mineral Oil | CNC Machine |
| Beeswax | V-Groove Router Bit |
*I use affiliate links, please see details on my disclaimer.
If you’d like to see a list of all the tools and equipment I use in my shop, you can browse it HERE.
How to Make an American Flag Cutting Board
This is one of the more complicated cutting board designs to pull off. There are multiple skills to master inside this process that will test your woodworking skills and your patience. You’ll learn end grain glue-ups and how to flatten them, building a board in sections, and the process of CNC inlay. This is a project that you definitely take one step at a time and you can pull off one impressive looking design!
Follow along below to learn how it’s done!

The Whole Enchilada Plan Bundle
The Whole Enchilada Plan Bundle! You want it all? You Got it! Get every plan I offer in one bundle at a savings of over 65%!
This product is a DIGITAL DOWNLOAD. You can immediately download your product off the order receipt page after the purchase. You will also immediately receive an email titled “Your MWA Woodworks order is now complete” that contains the download link in the “Downloads” section of the email.
Cutting Stock for The American Flag Cutting Board
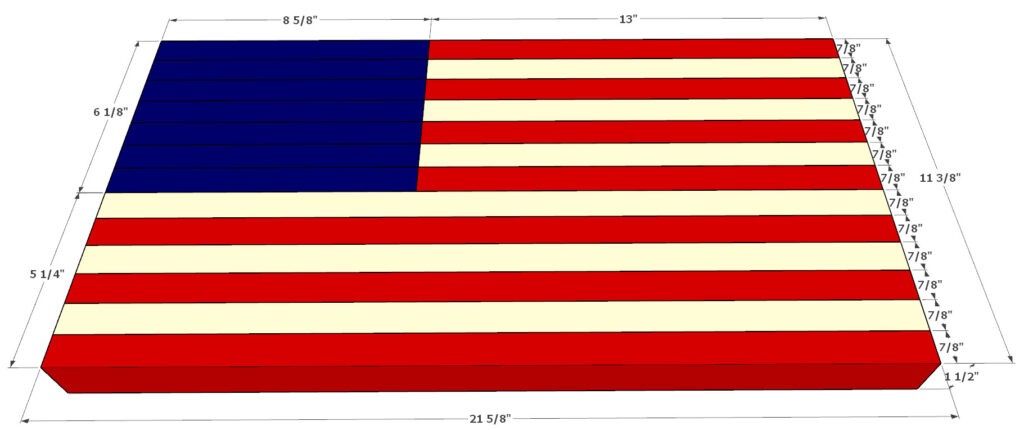
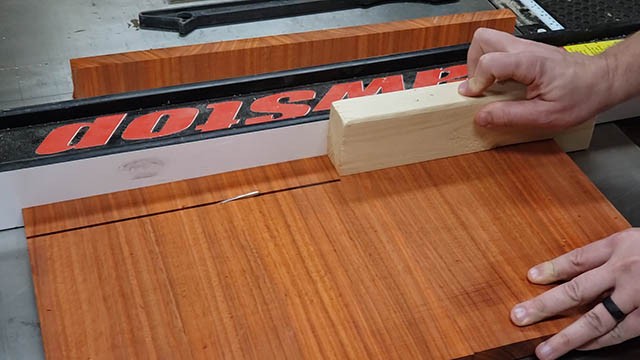
The first thing I need to do is cut everything to width at the table saw. How many blanks you need is really just dependent on how wide your lumber is. The wider the lumber the less blanks you’ll need. You need seven red stripes and six white stripes and each stripe should be about 1/5/8 thick when you turn them on edge. The sizes of the panels I made are as follows:
- Paduak (red) Panel: 12.5″ x 22″ x 1″
- Maple (white) Panel: 10.5″ x 22″ x 1″
- Purple Heart (blue) Panel – 12.5″ x 9″ x 1″
- You also need a piece of maple big enough that it can be resawed and glued into a 6.25″ x 9″ x .05″ end grain panel. This will be used to carve the positive side of the star inlay
The materials of choice for this board are paduak for the red stripes, maple for the white stripes and stars and purple heart for the star field.
You could use bloodwood for the red stripes as well but I think paudak ends up looking nicer.
First Glue-up – The Color Panels
The next step is to glue everything up into blanks. I need a red blank and a white blank and these are made by gluing the segments together. Glue them up edge to edge.
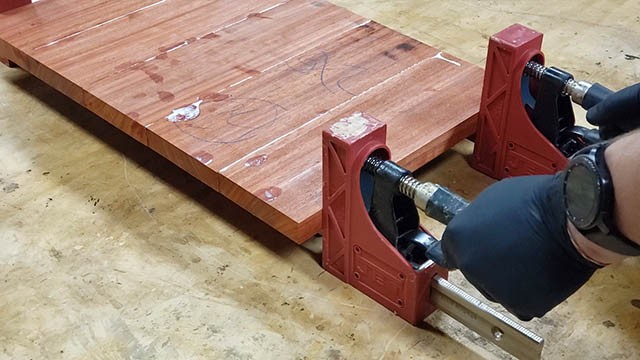
You should have one red panel, one white panel and one smaller purple heart panel.
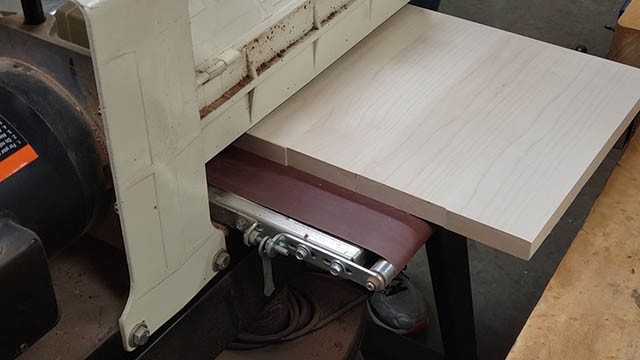
Once the blanks are dried I run them through my drum sander to clean them up and flatten them. The reason I’m using a drum sander here is because the grain is running perpendicular to the tool. Depending on what kind of planer you ran this through that could cause a real mess and a bunch of tear out.
The Whole Enchilada Plan Bundle
The Whole Enchilada Plan Bundle! You want it all? You Got it! Get every plan I offer in one bundle at a savings of over 65%!
This product is a DIGITAL DOWNLOAD. You can immediately download your product off the order receipt page after the purchase. You will also immediately receive an email titled “Your MWA Woodworks order is now complete” that contains the download link in the “Downloads” section of the email.
Cutting the End Grain Stripes
OK now that these are all cleaned up I need to cut them into strips, or should I say stripes, because these will become the stripes in the final board. Remember, you’re going for 1 5/8″ strips here to give you enough thickness to plane the final board down to 1 1/2″ thick.
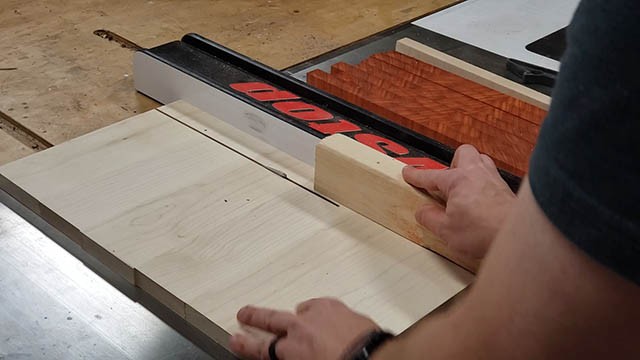
I need seven red stripes and six white stripes as well as seven strips of purpleheart.
I actually got seven white stripes out of my blank. I’ll save that extra one for another board down the road. You should take four of the red stripes and three of the white stripes and cut them to about 13.5″ long. These will be used to make the shorter upper segment of stripes. The remaining three red stripes and three white stripes will be glued together to form the longer bottom half of the stripes.
Once I cut everything to length you can see how everything will end up fitting together.
The Whole Enchilada Plan Bundle
The Whole Enchilada Plan Bundle! You want it all? You Got it! Get every plan I offer in one bundle at a savings of over 65%!
This product is a DIGITAL DOWNLOAD. You can immediately download your product off the order receipt page after the purchase. You will also immediately receive an email titled “Your MWA Woodworks order is now complete” that contains the download link in the “Downloads” section of the email.
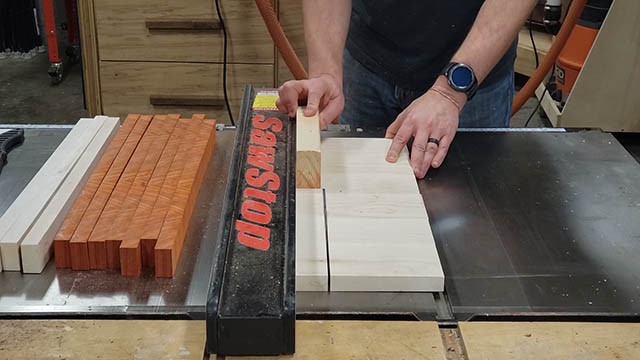
Making the Striped Segments

The next step is to glue up the red and white stripes into segments
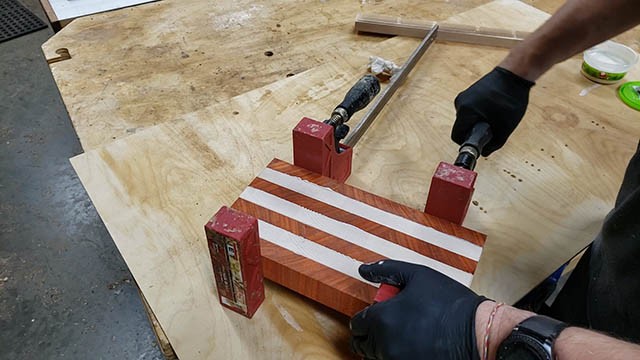
You’ll make a smaller segment of red and white stripes (the section next to the union), a longer segment (the bottom half of the board) and a segment of purple heart for the union.
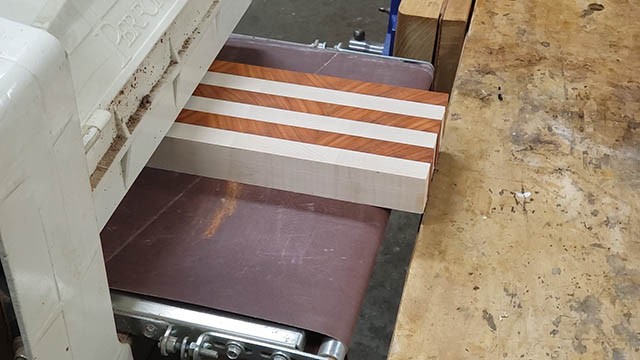
And once again I ran them through the drum sander to make them a consistent thickness and clean up all the glue.
At this point I have three segments. I have the long stripe section, the blue field section and the short stripe section that will go together like this.
The Whole Enchilada Plan Bundle
The Whole Enchilada Plan Bundle! You want it all? You Got it! Get every plan I offer in one bundle at a savings of over 65%!
This product is a DIGITAL DOWNLOAD. You can immediately download your product off the order receipt page after the purchase. You will also immediately receive an email titled “Your MWA Woodworks order is now complete” that contains the download link in the “Downloads” section of the email.
Creating the Star Inlays with CNC
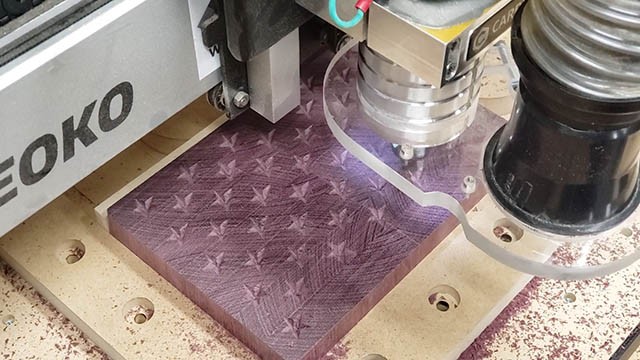
Now I need to use my CNC to cut the star inlays. This starts by making the relief cut in the purpleheart. This is the “negative” of the final image.
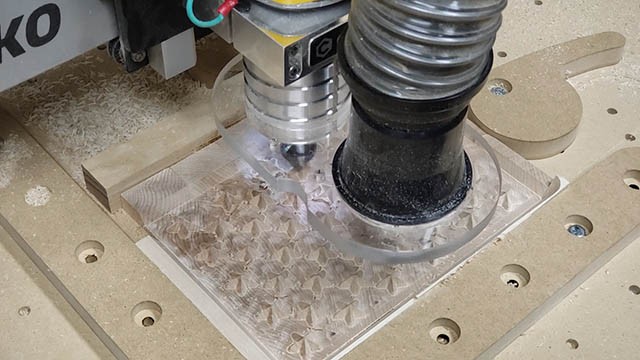
I then use a maple end grain blank to cut out the “positive” image that will next inside the negative. If you’d like to see a more in-depth video on how to do inlay like this, leave a comment down below and let me know.
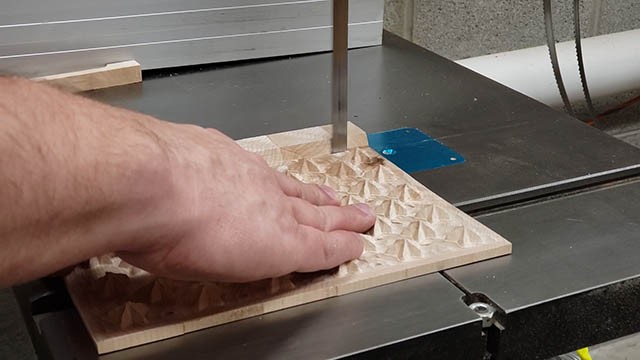
Next, I cut off the waste using my bandsaw. You could do this with a table saw if you want to.
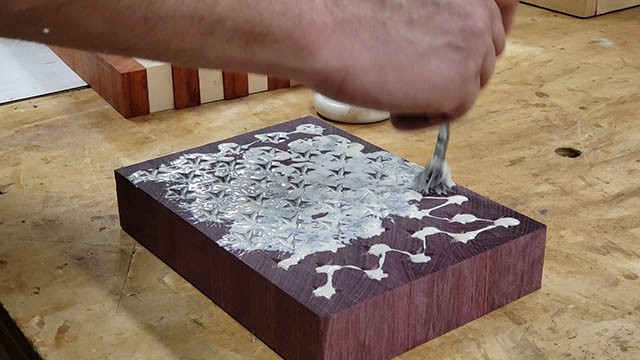
Then I just add glue to the negative space making sure to get good even coverage.
I then press the positive into the negative and apply firm even pressure to ensure everything is glued together without any gaps.
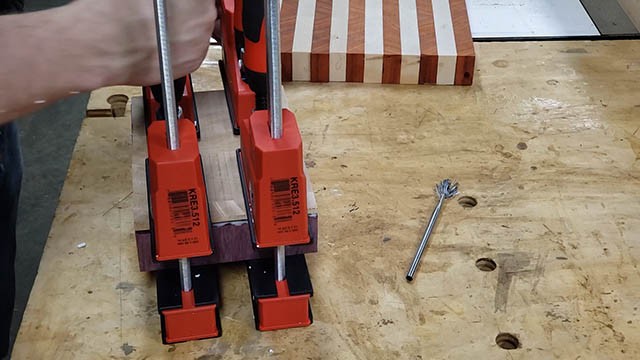
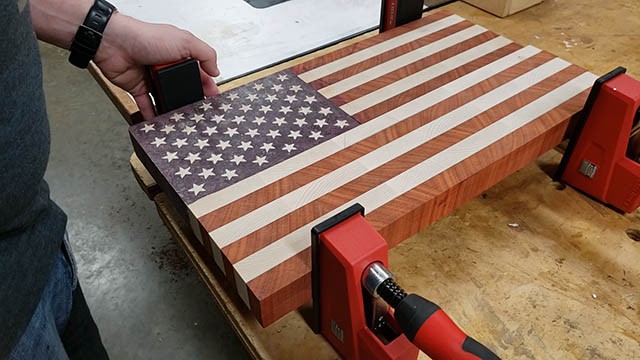
Four clamps might seem like overkill, but seriously this is the main feature of this board. You don’t want any unsightly gaps in the star inlays, so use as many clamps as you can get on that thing!
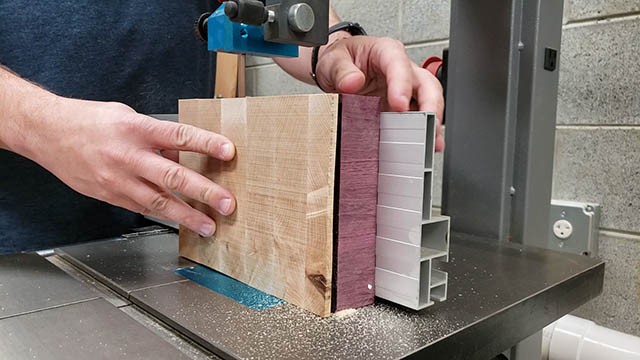
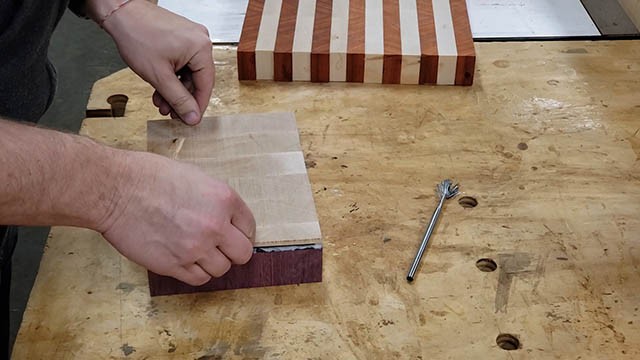
Once the blank is dried I just use my bandsaw to cut off the top and reveal the inlay.
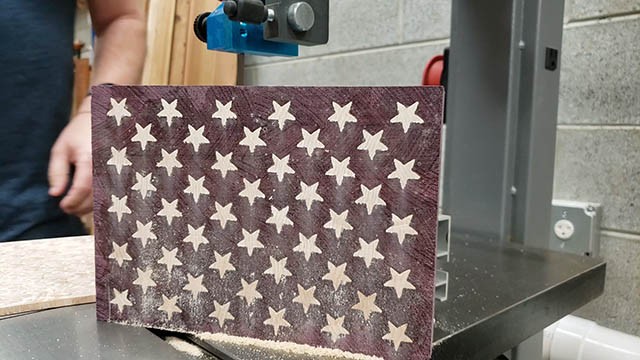
This is my second favorite part of this process next to oiling the board. Its so stressful waiting to see if the inlay worked out and a celebration when it does!
The Whole Enchilada Plan Bundle
The Whole Enchilada Plan Bundle! You want it all? You Got it! Get every plan I offer in one bundle at a savings of over 65%!
This product is a DIGITAL DOWNLOAD. You can immediately download your product off the order receipt page after the purchase. You will also immediately receive an email titled “Your MWA Woodworks order is now complete” that contains the download link in the “Downloads” section of the email.
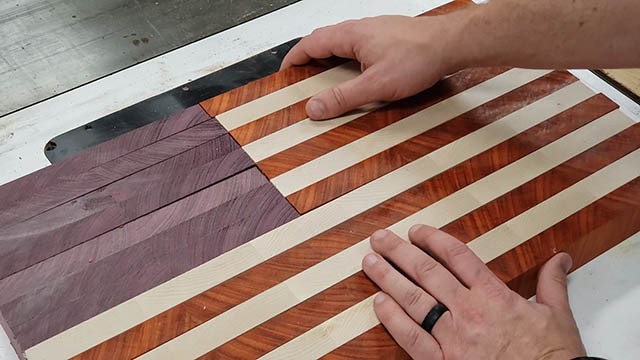
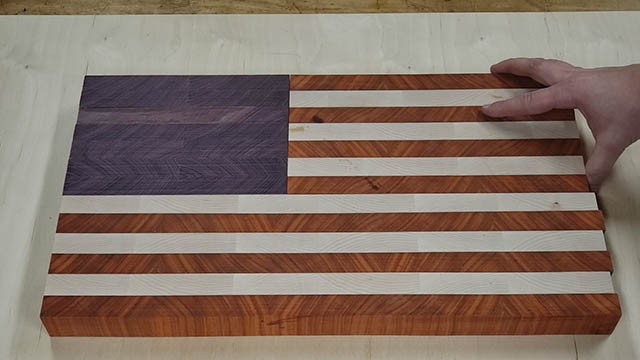
Assembling The American Flag Cutting Board
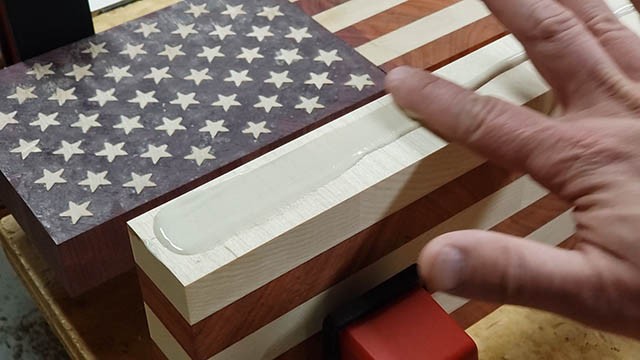
The next step is to glue the three segments together. I typically like to glue this in two stages.
First I glue the star field to the short stripes to make the top half of the board and then glue that to the long stripes to complete the glue-up.
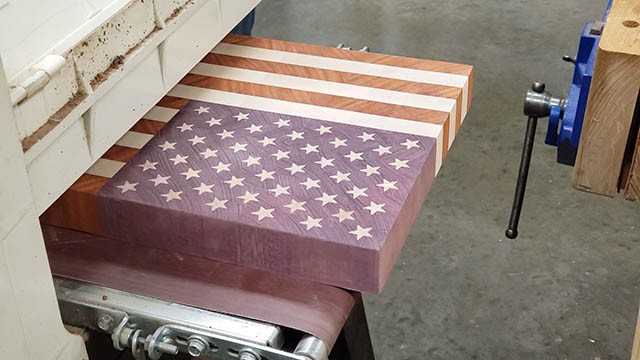
OK, I then give the board another series of trips through the drum sander to clean it up. This is where the drum sander is pretty much a must-have tool. You cant do this step with a planer or you’ll rip out the star inlays.
Final Details – Finish Sanding and Edges
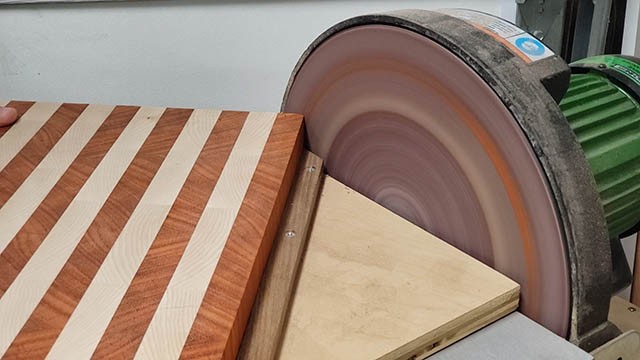
To finish the board off I nip off the corners with a sander.
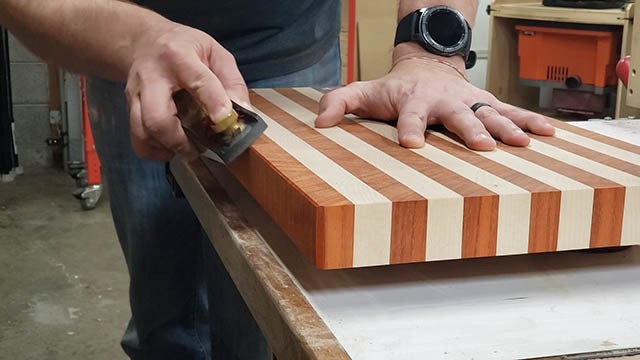
I then use a sharp blade in my block planer to break the edges of the board. I highly recommend a block plane over using a router bit because even a slightly dull router bit will chew up this end grain, tearing up the board.
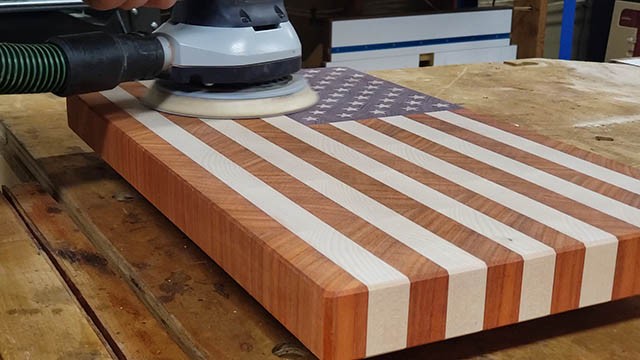
Sanding end grain is a long process. Start with a low grit, maybe 60 grit to work out the deep grooves left by the drum sander. And then progress upward to 80, 120, 180 and finally 220 grit. Each successive grit takes less time and by the time you get to 220, it takes all of 5 minutes.
The Whole Enchilada Plan Bundle
The Whole Enchilada Plan Bundle! You want it all? You Got it! Get every plan I offer in one bundle at a savings of over 65%!
This product is a DIGITAL DOWNLOAD. You can immediately download your product off the order receipt page after the purchase. You will also immediately receive an email titled “Your MWA Woodworks order is now complete” that contains the download link in the “Downloads” section of the email.
Finishing the American Flag Cutting Board
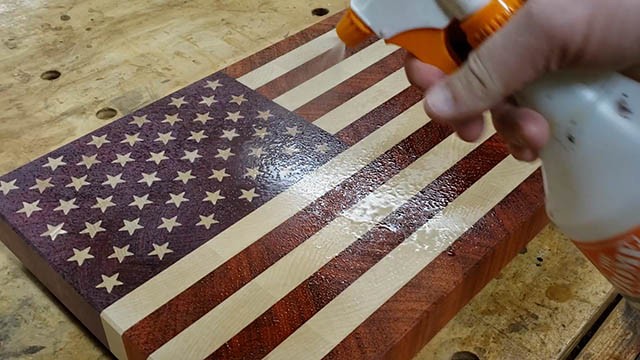
After sanding everything to 220 grit I pop the grain with water and sand it back again. This will prevent the board from feeling fuzzy when it gets wet in the future.
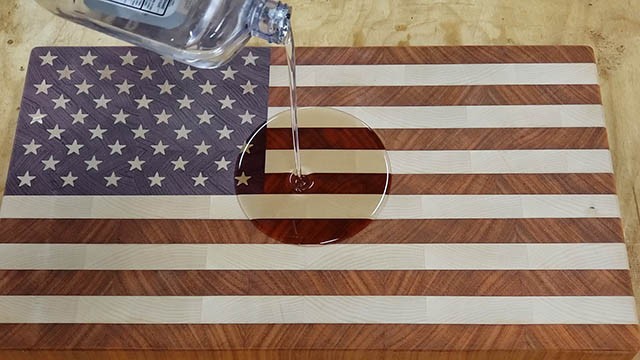
And the last step is by far the best step. I give the board a bath in mineral oil and watch the colors come to life.

I use straight mineral oil on all my boards before I seal them with wax paste. End grain boards are particularly thirsty so I apply enough oil that I don’t see the board soaking it in any longer. I do not “dip” my boards into a tub of mineral oil. This usually over-saturates the boards and they leach oil for days. That’s no beueno.
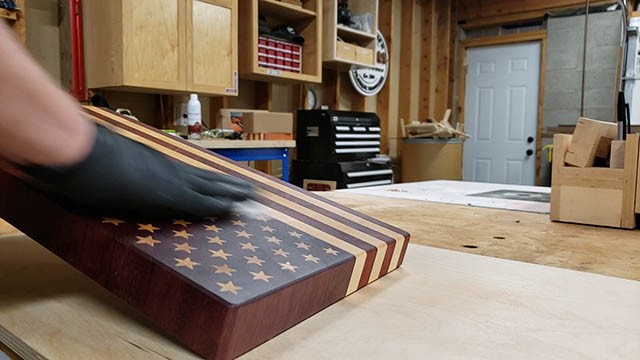
I then buff on a coat of wax to give the board a nice soft sheen. I have a tutorial on how to make an oil/wax paste that I use on all my boards. You can read it HERE.
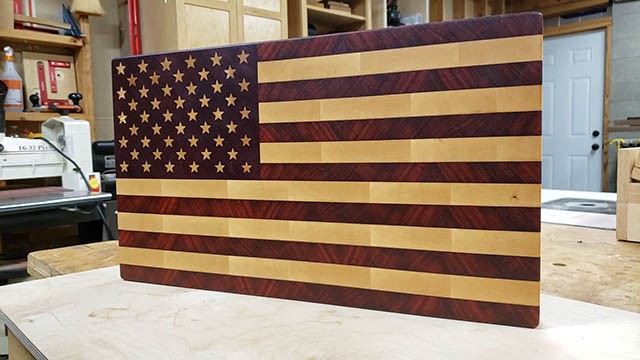
There you have it. A US flag end grain cutting board!!


One of the nicest American Flag Cutting Boards that I’ve seen to date. Nice mix of hardwoods used capturing the most natural woods that mimic the stars and strips of old glory.
Thanks Danny! It took a couple iterations but I finally got the color where I like it.
Hello Matt
I love this cutting board design. I can’t wait to make one for my dad.
I have a small cnc table top mill. How can I get g-codeprograms? Do you sell them?
I don’t! Due to all the differences in CNC machines, design programs and such I end up being more tech support than anything else so I don’t offer them. Sorry!
Do you have a video how you did the positive and negative cuts with your CNC, or an explaination.
Thanks, Earl
do you have the plans for the cnc machine
do you have the cnc files for this
nope I dont offer them
Hi:
I’d like to learn more about the CNC router inlay process. I do not currently have one, but am thinking about acquiring onre in the near future.
Thanks:
Gary
Hey Matt. Thanks for the vid. I plan on making a couple soon. Quick question. What size router bit did you use for the stars? Thanks.
Dan
I used a 60 degree v-bit
Such a nice blog on American flag cutting board and I hope you keep update us with such great tips and information in future too. This is a great post; I will share as much as I can.
I’d love a copy of your cnc files
I would like instruction on how to make the stars using Vectric 10.5. Thanks
I would love to see a video about the CNC !
What brand of block plane did you use in this project?
Thanks, Gage
Perfect!!!!
I am interested to see how you accomplished the inlay.