Table Saw Outfeed Table
With this walkthrough you can build my ULTIMATE outfeed and assembly table. Features include solid maple construction, adjustable leveling feet, six large drawers and three smaller drawers for storage and organization, a platform for larger tool storage like an air compressor, aluminum rails for vertical work holding and a massive 6ft x 5ft laminated work surface with MFT style dog holes for work holding and assembly. This work table is designed to be the absolute center of your work shop!
Tool & Supplies Links
For General Assembly
Wood Glue – https://amzn.to/3j69Piu
Festool Domino XL – https://amzn.to/3Rd8aUT
Doweling jig – https://amzn.to/3kKoC2V
Countersink Drill Bit - https://amzn.to/3R5VgIt
Mallet – https://amzn.to/3Jj2lUe
Tape Measure – https://amzn.to/3XBZBFA
Speed Square – https://amzn.to/3R9cqos
Jig Saw – https://amzn.to/3Djuu9P
Drill/Driver set – https://amzn.to/3DFicsD
Pocket Hole Jig System – https://amzn.to/3Y2CIe7
Dado Blade Set – https://amzn.to/3XxPpxT
¾” Pipe Clamps (clamps only) – https://amzn.to/403PHhF
Small F Clamps – https://amzn.to/3jbl7SH
For the Adjustable Feet
Adjustable Levelling Feet (x6) – https://amzn.to/3kOBmp1
½” Drill Bit – https://amzn.to/3HwOFna
Self Centering Drill Bit – https://amzn.to/3kFHVKF
For the Aluminum Rails
80/20 Rails (780mm & 1143mm) – https://8020.net/40-4080.html
Drop in T Bolts (x12) – https://8020.net/13148.html
6mm Washers (x12) - https://8020.net/13-6041.html
6mm Nuts (x12) - https://8020.net/17-6065.html
Festool Clamps - https://amzn.to/3JhXfY4
Microjig Clamps – https://amzn.to/3RbDR0R
For the Table Top
Formica Laminate (4x8 sheet) – https://amzn.to/3XDLkbF
Laminate Scoring Tool – https://amzn.to/3Y1kpq0
Contact Cement – https://amzn.to/3WES73w
Laminate Roller – https://amzn.to/3j9Lbxm
Trim Router – https://amzn.to/3kJXilg
UJK Parf Guide – https://tsoproducts.com/tools-equipment/ujk-parf-guide-system-mark-ii/?ref=MWAWW
UJK Chamfer Tool – https://tsoproducts.com/bench-dogs/ujk-combined-chamfer-reamer-tool/?ref=MWAWW
1” Rabbeting Bit – https://amzn.to/3XHJfv7
Cabinet Hardware
Undermount Drawer Slides (21”) – https://amzn.to/3HznSqf
Undermount Drawer Slides (15”) – https://amzn.to/3kNUYcU
Drawer Pulls – https://amzn.to/3JhPhhy
*I use affiliate links, please see details on my disclaimer.
Making the Outfeed Table Frame
I've been needing this table for 10 year. I finally built it. This is how I did it :-)
So, to get started on this new assembly table I’m going to cut the parts that make up the frame.
And the wood I’m going to use for this is hard maple. I chose that because all the shop cabinets and stands I’ve built the last couple years are maple so this’ll match the look of those thing.
I like using maple for my shop projects because it’s a very dense, heavy wood that’s easy to obtain in my area and relatively cheap compared to other hard woods.
Now I’ve got one fat stack of boards that need to be milled flat and square. So, I send everything across the jointer to get one face totally flat.
Then I can run them through the planer to get a nice flat surface on the other face. I love sticking rough lumber into the planer and watching it come out the other side nice and clean. It’s so Magical!
Next I head over to the table saw to cut everything to rough width.
Outfeed Table Legs
OK with all my parts milled up it time to glue up some leg blanks. I’m using two pieces of 8/4 maple sandwiched together to make one leg blank.
This will give me enough material to mill the legs down to 3 ½ inches square. I’m also gluing multiple pairs of legs together to save on clamps.
I need to cut all my other frame parts to final length and I like to gang similar pieces together.This helps in making the final assembly square because it guarantees all the corresponding sides are exactly the same length.
Then I run them back across the jointer on two sides to clean up those joints and get two flat, square sides.
Then back through the planer to get the other two sides flat and square as well.
Look at those beautiful legs! Next up, joinery.
Outfeed Table Joinery
Now it was time to put this in easy mode and use my domino to cut all the mortises. You could use a drill and doweling jig or you can cut traditional mortise and tenons which will both be just as good but take WAY longer to cut.
I also need to cut mortises in the ends of all the other frame parts which is easy too, just point and shoot.
The only legs that don’t get dominos are the middle support legs.
To do this I stuck my dado stack in the table saw and hogged out all that material.
Outfeed Table Assembly
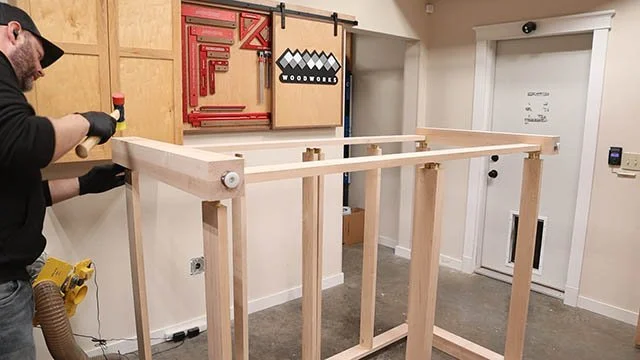
The best way to tackle this was to assemble the long sides first, which would be the front and back sides.
x
One thing about pipe clamps is they can exert a lot of force quickly. Enough that I can easily bend this stretcher.
So if this happens to you just back off the clamping pressure until you see both the pipe and the board are straight again.
OK fast forward and both the long sides are out of the clamps. But before I continue building this is a great time to install leveling feet.
Outfeed Table Leveling Feet
Any outfeed table should have these because you never want to try and build your table right at the exact height of the saw.
I countersink a tiny bit to allow for the plate to sit flush and then drill down into the leg. Then I can screw this thingy to the foot making sure to drill pilot holes first.
Then the feet just screw in and now this table is fully adjustable to get it to just the right height.
OK, now I need to add a bunch of dominos to all these mortises. I don’t know why but tapping in dominos is one of the most satisfying feelings.
Outfeed Table Assembly II
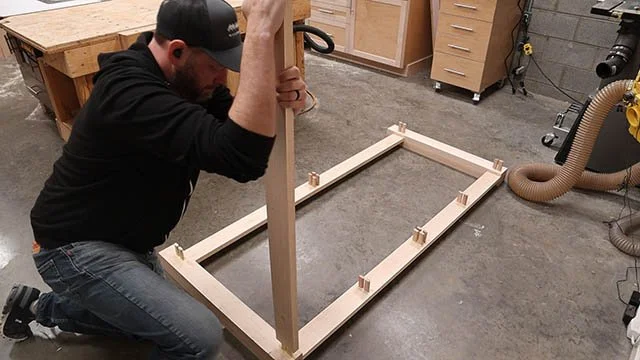
And now I’m realizing that I need to take this to the floor to begin adding the sides and stretchers.
I made sure to add some support under the middle to make pressing on the stretchers easier.
OK now comes the most stressful part of the whole build. I need to get 20 dominos to line up perfectly with 20 mortises before all this glue begins to dry.
Once I got this end lined up I worked on the other end and slowly but surely it went together.
Even without clamps this thing is ridged enough to flip upright.
That’s when my plan almost hit a snag. My longest parallel clamps are 50 inches and I have plenty of those on hand but this frame is 52 inches wide.
However I discovered that by luck I could squeeze a couple more inches out of these clamps and they JUST fit and still were able to apply clamping force.
I get everything clamped up and surprisingly everything is pretty square.
Outfeed Table Front Cabinets
So, while that glue-up is drying, I can move on to cutting the cabinet parts. First, I like to rip off the ragged factory edge and make them nice and crispy.
Once that’s done, I can cut everything to final dimensions.
So installing the center support legs is pretty simple really I just need to find the exact center of the apron and lower stretcher.
Then I can add glue to the notches and line up the marks on the legs with the marks on the table.
Now with those legs installed I can begin installing the cabinets. I countersink some holes into the side panels and then I can clamp the panel in place.
These panels will get screwed into place.
And with all the side panels in place I can take some ibuprofen and work on installing the back panels.
This notch is easy to cut with a jig saw and a drill bit can make a nice relieve to quickly remove the center and clean up the bottom of the notch.
Now I can install it just like this and screw it into the side panels.
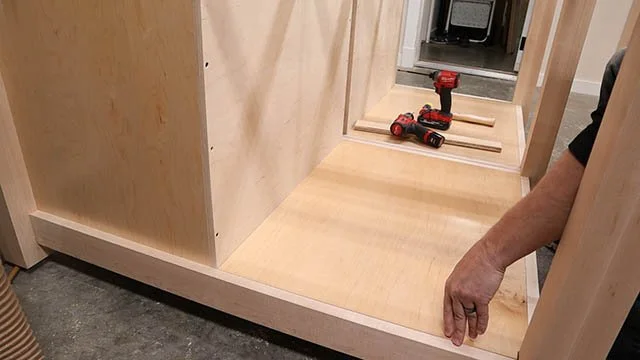
I added some small plywood cleats.
This also gives you the flexibility to install shelves and doors if you don’t want so many drawers.
Outfeed Table Back Platform
Behind the cabinets I’m going to add more cleats.
I plan on storing a bunch of larger items like an air compressor and jigs so the bottom needs to hold that weight.
Outfeed Table Drawers
OK now I need to fill those cabinets with drawers. I like making drawers out of 5/8 baltic birch ply. It has a clean look and 5/8 is the perfect size even for large drawers.
Then I cut a groove down all the sides to capture the drawer bottoms.
With my parts aligned like this they fold up and I can align the joints and make sure they are square then add a pair of clamps.
I pop in my pocket screws and I find glue to be optional here
Then I can slide the bottom in from the back side and tap it into the groove on the front of the drawer.
I like adding screws here, especially for shop drawers that’ll end up holding a good amount of weight.
Installing Drawers
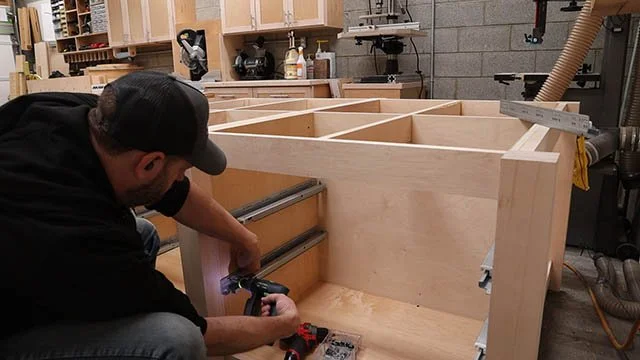
Now to install these I am using undermount slides. You can save some money for sure and use side mount slides but I already have a ton of undermounts on hand from all my cabinet projects.
In my opinion though if you build drawers using the method that I do, then installing undermount slides is a breeze and there’s so much more adjustability.
Side Cabinet
So wouldn’t you know it, I decided I didn’t need all this dead space on the back and that I could squeeze in one more bank of drawers if I planned my cuts correctly with my remaining plywood.
I quickly cut some new parts and assembled the cabinet outside of the table using screws for the bottom As well as the back.
And now if I made all my measurements accurately this thing should just drop straight in from the top… BAM! I secured it with a few screws and whipped up three more smaller drawers.
Drawer Fronts
I’m making all the drawer fronts from the same pre finished maple ply. The only additional step is adding edge banding for a clean look.
Since these cabinets are inset I can add spacers to the bottom rail to position the drawer front where I want it and fasten it to the cabinet through the holes I made for the pull.
Outfeed Table Rails
Since my new assembly table wont have a vice I needed to come up with a new vertical work holding solution and I think I found it with this aluminum extrusion. The only problem is how to access the slots.
To do that I made a wooden spacer that was thick enough to extend the slots beyond the face of the legs and the rail will fasten to the spacer with these drop in t bolts.
I used my old friend two sided tape to secure the spacer while I drilled pilot holes into the apron.
Then with the t bolts in the rails I slid the bolts through the holes and fastened them with washers and nuts from the inside.
Now I can access these slots with my Festool clamps and even my microjig dovetail clamps fit which makes me super pumped!
I added a second rail to the end of the table as well.
The final detail to add to the base is to cover the exposed plywood edges with a piece of trim. This is just glued in place and clamped using painter’s tape.
Outfeed Table Top
So with the base finished I can focus on the top which I’m making out of MDF. I don’t want anything complicated like a torsion box and I don’t think it needs to be real thick because I have all those thick supports built into the frame of the table.
And I’m going to laminate the top with this black Formica.
Formica is used every day to make kitchen counter tops, its really durable and wear resistant. Its easy to cut with this special scoring tool that kind of looks like a saw tooth welded to the end of a hook knife.
And it snaps easily right at the score line.
Laminating Formica Top
The go-to method of laminating Formica is contact cement. The good news is that contact cement is really simple to use.You just roll it on and within 15 minutes its tacky to the touch.
Once both sides are dry, I just place some spacers between the two surfaces and line the laminate up carefully.
Then working from the middle I remove one spacer at a time and press the Formica down.
Next I use this special roller to press the formica into place and drive out any air pockets that might compromise the bond.
You can use a trim router literally to do the job that the tool was designed for and flush trim the laminate to the edge of the MDF.
And just like that you have one Darth Vader looking top.
MFT Hole Grid
I’m making my top in two halves for a reason. I have one more feature I want to add to the top. To create the MFT style grid of holes there are a few tools you can pick up like the UJK parf guide system or there are other youtubers who’ve made their own homemade jigs for doing this job. But I don’t have the parf guide system or a jig but I DO have a CNC and this is the perfect job for it. After designing up the hole pattern in my design software I let the CNC do the precision cutting.
Attaching The Top
Then to protect the edges I’m trimming the top with some maple edge banding. I could have easily added this edge banding BEFORE I laminated the top had I had just one ounce of forethought. Oh well, looks good though.
To secure the top to the base I drilled some pocket holes along the perimeter. This way if I need to replace either half of the table it’s as simple as unscrewing it and I don’t have to deal with replacing the entire top if I don’t need to.
Miter Slots
And since this is an OUTFEED assembly table the last detail to add is to rout two slots to match up to the miter slots on the table saw. To do this I used a router with a 1” rabbeting bit. I took it in a couple passes to keep it safe.
Now my miter gauge or crosscut sled can slide without running into the edge of the outfeed table.
And just like that this thing is ready to go to work!


