How to Build Wall Cabinets FOR KITCHENS AND PANTRIES
In How to Build Wall Cabinets I'll walk you through my method of building two different styles of standard wall cabinets. One using simple pocket hole construction and one using more traditional dado joinery. I then show you how to combine them into one unit!
Materials & Supplies*
Tools*
3/4" Plywood
1/4" Plywood
5/8" Plywood
True Position Tools Cabinet Hardware Jig
*I use affiliate links, please see details on my disclaimer.
How to Build Wall Cabinets
Alright, to do the two different versions of these cabinets I need some ¾” for the carcasses, ½” ply for the door panels and backs and ¼” ply for the backs of the traditional style cabinets. The first thing I need to do is break this plywood down into manageable chunks.

If you’ve watched my previous videos you know I love doing this with one of these centipede work holders with a piece of foam insulation on top. Its quick to set up and lets me cut at a comfortable height and not on the floor. To break this down you’ll need a circular saw and a straight edge at a minimum. But I like using my track saw because there’s much less dust created in the shop which is important to me.

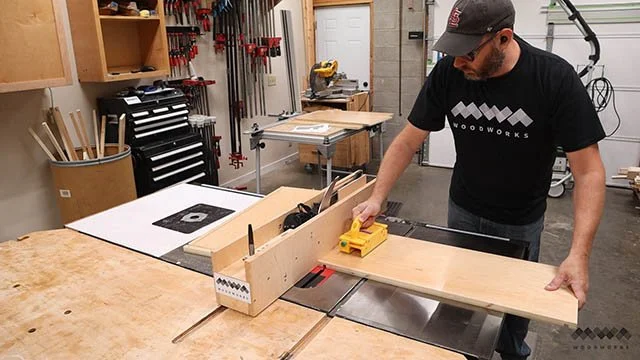
After I have all my blanks cut, I can move to the table saw to cut all my parts to final size.

The first thing I like to do is cut off the ragged factory edges. This will make everything clean and crisp on all sides.

Now, compared to base cabinets, the wall cabinet parts are pretty straight forward and much smaller.

I’m going to make two 30” cabinets and two 18” cabinets.

Then I’m going to combine each 30” to an 18” cabinet to make two 48” units. You’ll see how that happens later in the walkthrough.

And just like that I have all the parts to make my cabinets.

How to Build Wall Cabinets - Basic Shop Version
OK, first up I’m going to show you the more basic form of construction which uses pocket screws. But you’ll notice, I’m not using my normal pocket hole Jig.

This is a Castle pocket cutting machine and it’s changing the way I make pocket holes.

This machine uses a set of routers to cut the pocket as well as the pilot hole for the screw all in one easy motion.

You can see here when I push back on the lever one router bit swings up cutting the pocket.

And when I pull the lever forward another bit drills the pilot hole.

The result is a very clean pocket with no debris left inside and the ease of use makes this machine very quick at cutting lots of pockets in my cabinet parts.

Next I need to cut a rabbet along the back edge of each side which is going to house the back panel of the cabinet.

To do this I’m just using a regular table saw blade and taking multiple passes until I can fit my back panel into place nice and flush.

Now with this simple spacer block I’m going to use my shelf pin jig to drill out all my shelf pin holes.

I very much recommend doing this step now, before assembly, because its much easier to drill accurate hole locations.

As I mentioned assembling this version of the cabinet is going to be pretty basic.

I’m lining up the bottom panel flush with the sides and clamping it into place before I drive my pocket screws home.

I then repeat that same process with the top panel, making sure I assemble the cabinet face down so the rabbets I cut in the sides are exposed.

I quickly double check everything for square before I add glue to the rabbets and slide in ½” back panel.


I’m going to countersink and screw the back panel into place for added strength.

Then clamp the sides so the rabbet joints are nice and tight.

I got a little glue squeeze-out along the back corner which I’m just going to clean out with a straw.

How to Build Wall Cabinets - Traditional Version
OK Next I’ll show you the more traditional construction method and this begins with making some rough reference lines because we need to cut a bunch of dadoes and I need to keep them straight so my two sides mirror one another when I’m done.

First, I’m going to use the back nailer to set the distance to the fence and cut a ¼” groove along the back of each side piece which is going to house the back panel.

But before I move the fence to take my second pass, I’ll begin cutting the dados along the top and bottom.

I go ahead and do the same to the other side.

Then, I tap my fence outward to sneak up on my ¼” mark for the back groove.

I keep nibbling away until the back panel fits nicely into the groove.
Next, I repeat the process with the dados on the top and bottom, continuing to tap the fence outward after each pass.

I’ve got to keep doing this until the dadoes are wide enough to fit the top and bottom panels.

Now, if you happen to have a router table this process can go a bit quicker. I still use my back nailer to set the distance to the fence and then use a special undersized plywood bit to cut the groove in the back.

I then use another undersized ¾” plywood bit to cut the top and bottom dados.

The undersized bits are made specifically to make sure your dados are the right size for plywood since plywood is never ¼” or ¾” thick.

OK with my dados cut I add glue to the top and bottom but not the groove on the back.

I can then slide my top and bottom panels into the dados and I go ahead and do an initial check for square before adding the clamps.

I then re-check for square to make sure nothing went out of whack and then clamp everything together.

Next I slide the back panel into the groove making sure its flush with the ends.

Then, I add the two nailers in place and fasten them with pocket screws.


Off camera I went ahead and built the 18” cabinets the exact same way and now I want to combine the 30” and 18” together to make one 48” cabinet unit.

After lining up the edges and clamping them together I add screws above and below the top and bottom panels so they wont be seen inside the cabinet.

While I’m at it I double check the dimensions for making the face frame. Oh, and I also forgot I need to fasten the back panel to the nailers using brad nails.

For the simpler pocket screw cabinets, I don’t really have a way to hide these screws from sight so I’m just going right into the inside of the cabinet. But hey that’s OK, these are shop cabinets anyway. Did I just rhyme that?

How to Build Wall Cabinets - Face Frames
Alright, with the carcasses fastened together I can make a face frame for each.

To start I cut up some pre-surfaced hard maple lumber at the chop saw. I like using pre-surfaced lumber here because it doesn’t require any milling machines, I can just cut it and begin building.

After chopping out the blanks, I head to the table saw to rip my parts to width.

After that, I cut everything to final length using a crosscut sled and ganging my parts together.

I’m going to assemble these frames with pocket screws, so I clamped a guide to the table of the pocket cutting machine and batch these out quickly.

Besides making super clean pockets the other advantage to this pocket cutting machine is the angle of the screw is much shallower than the typical 15 degrees of a drill pocket jig.

That matters because these screws are going in almost parallel to the work which virtually eliminates the dreaded pocket hole creep that happens where your work piece moves slightly as you fasten them together.

You can see here I’m using just my thumb as a clamp which I would never attempt with a 15 degree drill pocket hole.

Soon enough I have this face frame together and I give the whole thing a sanding to 180 grit to make sure all the joints are nice and flush.


Since m y cabinets are not going to be painted, I an just going to glue it to the carcass and fasten it with clamps. Lots and Lots of clamps.

If I were painting these I would use brad nails instead of clamps and just fill in the holes before painting to avoid needing all these clamps.

You can see here the number of clamps I used to make sure this was securely fastened.

How to Build Wall Cabinets - Doors
OK, next come the doors and I’m going to be using the same pre-surfaced maple to make the frame parts. Now if you’re making shop cabinets, you can probably just use ¾” plywood panels for the doors, but I didn’t want to waste time showing you how to cut a rectangle and fasten it to the cabinets so instead I’ll show you how to make frame and panel doors which are simple to make on the table saw and will look much better if your making your cabinets for a kitchen or pantry.

All these frame parts are two inches wide, so I just set me fence to two inches and start cutting.

I ended up cutting the longer stiles using my miter saw but to do this at the table saw I just need to install my cross cut saw blade and break out my crosscut sled again to cut the parts to length.

The crosscut sled is my preferred way to make super accurate cuts and I think its safer too, especially for the smaller rail parts versus using the miter saw.


Once that’s done I put the ripping blade back in the table saw so I can cut grooves in all my frame parts.

The grooves will house the center panel in the finished door. Again I’m using just a single saw blade to make a pass, then flip the piece end for end to make another pass and perfectly center my groove.

Next I need to cut tongues in all the top and bottom rails. Normally I use my tenoning jig for this, but I decided to show you another way to do it.

I installed my dado stack to make quicker work of these cuts and laying a test work piece flat I make some cuts until I sneak up on the fit I want.

Then I can take my real top and bottom parts and begin making the tongues in the ends of each.

Next I need to cut some ½” ply to make the center panels.

Pretty simple these aren’t real big and I set my dado stack back up to make a rabbet around all four edges of each panel. I’m using a sacrificial fence to bury the dado stack in so that only 1/2” is exposed.

With a dado stack, this process goes real quick and its on to assembly.

To start I add glue to the tongues on each end of the top and bottom rails and slide them into the groove in the side, or stile.

x

I then slide the center panel into place making sure it sits in the groove all the way around before adding the other stile.

I give the ends a tap to make everything as flush as possible and then add the clamps. Just two clamps are needed, one spanning each joint.

I then set those aside overnight to dry.

After removing the doors from the clamps I trimmed the top and bottom joints just so everything was flush and each door was the exact same length.

Before I used my door hinge jig to create pockets for my European style hidden hinges.


I laid a scrap of plywood down to create the reveal I wanted at the bottom and attached the hinges to the face frame.

First pre-drilling and then screwing the doors into place.


After making some adjustments to the hinges, the doors sat perfect and even with one another.


I could then use this handy door hardware jig to drill the holes for the door pulls.

And that’s that for the doors! Well, I have a few more pulls to install, but you get the idea.

How to Build Wall Cabinets - Shelves
The last thing to do here is add shelves, but before I install them I want to add edge banding to the front edge.
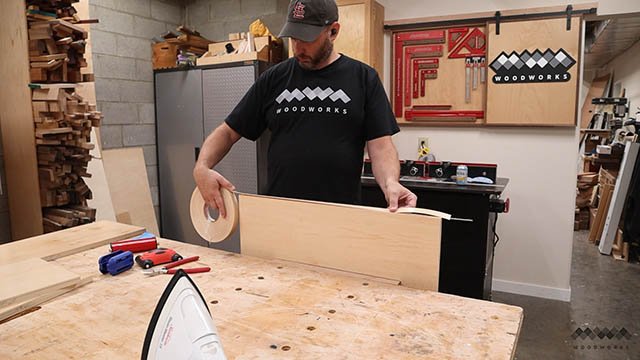
I’m using iron on edge banding which I like because of it’s simplicity. Using an iron activates the glue and sticks the edge banding to the shelf.

I then use a roller to ensure a nice firm bond and set the shelf aside to cool down while I do the next shelf.

Next, I trim the edges flush and trim the side waste using this double edge trimmer and then quickly sand the rough edges smooth.


I can then break the edges with a sander to make them nice and smooth.

These shelves snap into place using these plastic shelf clips that fit in the shelf pin holes and hold the shelves securely in place.

And that’s it! Two sets of wall cabinets done with two different construction methods.
